Browse Category

Computers

How to Stop MacBook from Sleeping

I have a spare MacBook Pro that I’m using to run a 24/7 Plex media server for streaming movies and shows to my TV. I thought hey, I can run a Discord bot on this machine as well! So I simply ran npm start in a terminal window and expected my Node.js Discord bot to be up and running as long as my computer was on.

One problem ocurred: each time macOS went to sleep, my node script would stop running as well. When I moved the mouse to wake up it, the bot would go back online, and then go back to sleep soon after. Even enabling the Amphetamine app wasn’t keeping my bot online.

So I did some googling, and found a new command that I had not known about: caffeinate

We simply need to give our npm command some caffeine so it doesn’t go to sleep:

caffeinate -s npm start

And voilà! My Discord bot has been online ever since I’ve ran the command.

If your node script is already running and you don’t want to restart it with the caffeinate command, you can find the process ID of it by using: ps | grep node and keep it awake like this:

caffeinate -w <PID>

Setting up a brand new OS X for web development

After getting a new MacBook for work, there were a few things I installed to make it better for coding, which I have listed below.

Oh My Zsh

Oh-My-Zsh is an open source, community-driven framework for managing your ZSH configuration. It comes bundled with a ton of helpful functions, helpers, plugins, themes, and a few things that make you shout… “Oh My ZSH!”

To install, run this command in terminal:

curl -L https://raw.github.com/robbyrussell/oh-my-zsh/master/tools/install.sh | sh

Solarized

A theme with a nice color palette to make looking at the terminal easier on the eyes.

Sublime Text

The best text editor for coding.

subl terminal shortcut

Edit ~/.zshrc , and add this line to the very end of the file:

alias subl='/Applications/Sublime\ Text.app/Contents/SharedSupport/bin/subl'

Restart terminal for the change to take effect.

Samsung TV Overscan HDMI Fix

I connect my hackintosh to my Samsung TV to watch movies, but there’s a problem where the TV cuts off part of the edges.

tv1-edgecut

If I open up the OS X Displays Preferences, there’s a checkbox for “Overscan”. Unchecking it will show my entire desktop on the TV with nothing cut off, but now there’s a black border.

tv2-osx tv2-osxoverscanoff
So I’ve been using it like that for a few weeks now, but I decided to look for a fix to get rid of the black borders. I searched online and found this post from storageforum.net: How to Disable overscan on a Samsung “SMART” tv – solved

What the user Sol did was changing the “Edit Name” for the HDMI connection to “PC”. So I tried it out.

tv3-hdmi tv3-edit tv3-pc
Success?? No, not yet. It only made the black border even bigger for me!

tv4

I opened up the OS X Displays Preferences again, and turned Overscan back On, and voila! My whole desktop can be seen now, with no black borders on the Samsung TV!

tv5

P.S. My Samsung TV is new, and I haven’t removed the plastics and energy guide sticker yet. :)

Building a Hackintosh

I have a 13″ MacBook Pro with Retina display that I use as my main computer for everything I do at home, and I thought it’d be good enough for gaming. However, I started playing Counter-Strike: Global Offensive, and there is noticeable lag every now and then, especially in big maps that have a lot of objects to render. I had to lower the game resolution to somewhere around 720p, and only had the graphics settings on medium. Even then, I wasn’t happy with the low FPS I was getting.

This made me rethink about using a MacBook as my main machine. Since it was on my desk 99% of the time anyway, I should just use a desktop computer, right? I wanted a more powerful machine that could handle gaming, I still wanted to use Mac OS X, and I wanted it to be cheap (price wise). So what better thing to do than to build my own Hackintosh!?

The first thing I did was to head over to tonymacx86.com to check out this article: Building a CustoMac: Buyer’s Guide May 2014. That article provides a list of the easiest and best supported hardware options for installing Mac OS X.

The Parts

Like I mentioned above, I didn’t want to spend a ton of money on expensive parts, but still wanted it good for gaming. So the parts that I picked out are:

The total came out to be $1,259.55… which is a just little above what I paid for my MacBook.

The Installation

For the most part, it was pretty straightforward using this guide: UniBeast: Install OS X Mavericks on Any Supported Intel-based PC

To summarize my installation steps:

  1. Download Mavericks from the App Store on existing MacBook.
  2. Plug in a USB flash drive to make an OS X installer.
    • Make it 1 partition, set the option to Master Boot Record, format it to Mac OS Extended (Journaled).
    • Run Unibeast and let it put the Mavericks installer in the flash drive.
    • Copy MultiBeast into the finished flash drive.
  3. Turn on the newly built computer and change some of the UEFI settings.
    • Loaded Optimized Defaults.
    • Set X.M.P. Memory Profile to Profile1.
    • Change XHCI mode to Auto instead of Smart Auto.
    • Set EHCI to Enabled.
    • Set XHCI to Enabled.
  4. Boot up from the USB flash drive.
  5. Open Disk Utility and format the SSD.
    • Create 1 partition, Option: GUID Partition, Format: Mac OS Extended (Journaled).
  6. Install OS X Mavericks to the SSD.
  7. Now OS X should be running, open MultiBeast to install some drivers and tweaks to make the Hackintosh run better.

The End

This entire process took about 3.5 hours. Here’s the rough timeline of my steps:

  • I started building the computer around 5pm and finished building around 6:30pm.
  • The UniBeast part took ~20 minutes. I should’ve had this step running while I was building the computer.
  • Changing the UEFI settings took ~10 minutes. I was getting a kernel panic while booting into the installer, so I had to search online to see which settings worked.
  • Installing OS X took ~20 minutes.
  • MultiBeast took ~10 minutes. I looked online to see which checkboxes other people with a similar build had enabled.
  • I transferred Counter-Strike: Global Offensive files (~8GB) from my MacBook to my Hackintosh, which took ~20 minutes.
  • By 8:30pm, I got on Steam and was able to play Counter-Strike in 1080p on high graphics settings. And. It. Was. Smooth!

Overall, it was a pretty painless process and I am very happy with my new Hackintosh.

HackPro

P.S. Although the Logitech C920 webcam captures crispy clear images, it has a TERRIBLE microphone… it makes me sound muffled and far away. I will definitely replace this webcam with one that has a better mic, which is what I really care about because I talk online with my friends in Mumble everyday.

Scheduling PHP Cron Jobs with Parameters

I was making a PHP script for reading a resource account’s calendar from an Exchange server and then saving the data to a MySQL database. This script was going to be a cron job on the web server set to run every 2 minutes, and I was going to have multiple cron jobs for reading different resource account calendars.

Instead of having separate cron files for reading each account, I made one cron_rooms.php file that I could use with the HTTP $_GET variable. The PHP script worked great through the web browser, and the URL was something like this: http://website.com/cron_rooms.php?room=[name]

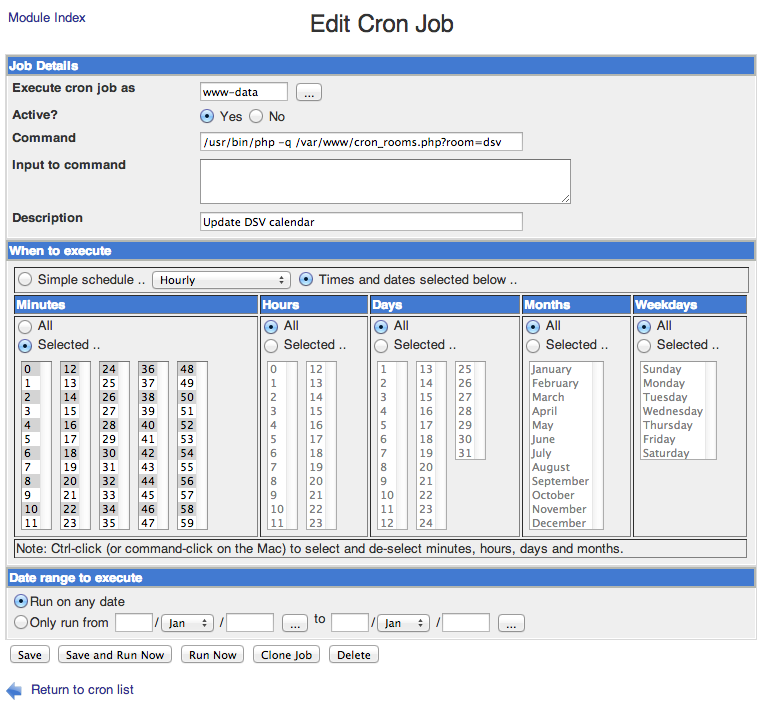
To schedule the cron jobs, I added them easily through the webmin web control panel in the browser.

webminCron

To do it through command line in SSH, I’d run this command: crontab -u <username> -e

Then I’d enter the lines below for updating my 5 rooms every 2 minutes.

0,2,4,6,8,10,12,14,16,18,20,22,24,26,28,30,32,34,36,38,40,42,44,46,48,50,52,54,56,58 * * * * /usr/bin/php -q /var/www/cron_rooms.php?room=dsv #Update DSV
0,2,4,6,8,10,12,14,16,18,20,22,24,26,28,30,32,34,36,38,40,42,44,46,48,50,52,54,56,58 * * * * /usr/bin/php -q /var/www/cron_rooms.php?room=9991 #Update 9991
0,2,4,6,8,10,12,14,16,18,20,22,24,26,28,30,32,34,36,38,40,42,44,46,48,50,52,54,56,58 * * * * /usr/bin/php -q /var/www/cron_rooms.php?room=9992 #Update 9992
0,2,4,6,8,10,12,14,16,18,20,22,24,26,28,30,32,34,36,38,40,42,44,46,48,50,52,54,56,58 * * * * /usr/bin/php -q /var/www/cron_rooms.php?room=9993 #Update 9993
0,2,4,6,8,10,12,14,16,18,20,22,24,26,28,30,32,34,36,38,40,42,44,46,48,50,52,54,56,58 * * * * /usr/bin/php -q /var/www/cron_rooms.php?room=9994 #Update 9994

So anyway, all is good and ready to go, right?… Wrong!

When the cron job runs, it’s giving me these errors:

Could not open input file: /var/www/cron_rooms.php?room=dsv
Could not open input file: /var/www/cron_rooms.php?room=9991
Could not open input file: /var/www/cron_rooms.php?room=9992
Could not open input file: /var/www/cron_rooms.php?room=9993
Could not open input file: /var/www/cron_rooms.php?room=9994

Why was the script working in the browser, but not in cron? Simple, the script I made was using HTTP GET requests that works for URL’s. When running in command line mode (which is what cron is using) I need to pass the parameters using arguments.

Solution: I replaced the $_GET[‘room’] variable in my script with $argv[1]. Then change each line in cron from this:

/usr/bin/php -q /var/www/cron_rooms.php?room=[name]

to this:

/usr/bin/php -q /var/www/cron_rooms.php [name]

In command line mode, $argv[0] will always contain the path of the script: “/var/www/cron_rooms.php”

And $argv[1] would be the first argument after the path: [name]

If we had more arguments, we can access them with $argv[2], $argv[3], etc.